Showing posts with label Tutorials. Show all posts

Monday, August 3, 2015

Stamps Galore

Card Collapsed
I'm loving last week's Color Challenge:  CC541 Rose Red, Mint Macaron, and Tip Top Taupe.  I used it to make another card for today's Technique Challenge TLC545 Fussy Cutting.  I pulled out quite a few stamps to make this card some of which, before today, had never been inked up.

Stamp Sets:
Gorgeous Grunge
Butterfly Basics
You've Got This
Best Thoughts
Best of Butterflies
Wetlands
Express Yourself


Partially Opened

Inks:
Rose Red
Mint Macaron
Tip Top Taupe
Black StazOn
White Gel Pen


Fully Opened


A Pictorial Tutorial:
4 1/4"x2 3/4"; 11 1/2"x5 1/2"
Score at 1/4"; 3 3/4", 7 1/4"


Cut away 5/8" at top left on first 2 panels


A closer look at cutting away 5/8" in picture #3


After 5/8" cut away


Fold on score lines using bone folder


Cut away small tab on top left side


After tab cut off. 4 1/4" x 2 3/4 panel from  picture #1 will be attached here.


Attach 4 1/4"x2 3/4" panel from first photo to the 1/4" strip
Decorated card & template of card

Sunday, June 17, 2012

Happy Father's Day

Here is the card I made for my husband.  I found the Tutorial on the Paper Craft Planet website. Start with a 4 x 4 piece of DSP; Fold in half so that you end up with a triangle shape; Open triangle up and use the center crease as a guide. Fold pointed end of DSP to center crease. Repeat with other side and turn over. Your project should resemble a cone. Take the top end (small folded tip) and fold down about 1/2 of the way down; crease, take the point and fold back up... not all the way back to the top... leave about 1/16 of an inch. Your project should look like a cobra snake getting ready to attack. On the section where the point meets the edge, fold again. Turn project over again and fold each side in to meet the center. Tie is complete. For the shirt: 5 1/2 x 4 1/4 inch card stock; fold top down about 1-inch; open back up. Cut slit in on the fold on each side leaving about 1 1/2 inches uncut in the center. To make the collar, fold side flaps down, secure with glue dots, add brads and the tie. Attached to front of your card.

Friday, February 10, 2012

'Tis the Season

These Christmas cards were so quick and easy and you can make a bunch of them in no time. I find the fastest way to make cards when you are making a batch is to score the card stock before you cut it. Here is what I did for these cards. Take 3 sheets of 8-1/2" x 11" Very Vanilla card stock and score each sheet down the center at 4 1/4". Cut each sheet in half so that you will have six cards that not measure 8 1/2" x 5". Quick and easy... a lot better than cutting each sheet in half, then scoring cards individually. Card Recipe: Gifted and Perfect Ending stamp sets; Very Vanilla and Cherry Cobbler card stock; Cherry Cobbler Ink; Cherry Cobbler Bakers Twine

Friday, July 1, 2011

My New Stamp Set and a Tutorial

Here's the card I made using the DTP technique. This is a new stamp set from Stampin' Up!'s 2011-2012 IB&C and will be available for purchase on July 1st.


When I attach the clear images to my new stamps, they sometimes fall off in the middle of stamping onto my card stock and I get unwanted smudges. My solution was to unmount my new stamps as I get them and stamp the image directly on top where the clear image is usually added. Here are pictures of my procedure. Try it and let me know what you think... it actually works great!

Here is the brand new stamp set before doing anything to it. I have my Archival Ink Stamp Pad ready as well as a clear block. I also used my non-stick pad that goes with my Scor-Pal.

Stamps popped out.

I used my Scotch ATG gun to add adhesive to my clear block.

I gently peeled the red rubber from the foam.

Place the stamp on the clear block. The adhesive from my ATG gun will hold it on.

Turn the foam part of your stamp over and stick the sticky side to your non-stick surface or mat. Remove the protective sheet from the other side. This is where you will stamp your image.

Ink up your image and stamp on top of the foam part of the stamp (cling side) while the sticky side is still down on your non-stick mat.

Turn the foam part of the stamp over so that the sticky side is facing up. Carefully match up the back side of the red stamp with the sticky side of the foam part of the stamp.

Pop your stamps back in place with the stamped side facing up so that the ink can dry completely. use the clear sticker images that you would ordinarily stick to your stamps to make a journal to keep track of your stamp sets.

My stamps no longer fall off my clear blocks.

Thursday, June 30, 2011

Christmas Doors

I made these "Christmas Door" cards for the SCS Christmas Card Challenge and the WT329 "Ways to Use It" Challenge. I am behind on my Christmas cards so this batch catches me up through April.

The "Ways to Use It" challenge was to use something 'old' (something from my stash I've had 6 months or longer) and something 'new' (something from my stash I've had less than 6 months). My 'old': dies I used to add embellishments to the corners of my cards. The 'new': half-back pearls I used as door knobs rather than brads. I saw these brown half-back pearls while browsing through our local Hobby Lobby and purchased them because they were different (to me).

Base Card: 8 1/2" x 5 1/2"

Panels - Cut 4 of each
Panel #1: 2 1/4" x 1 1/2"
Panel #2: 2" x 1 1/4"
Panel #3: 1 1/2" x 3/4"

Sponge all panels.

Score the 8 1/2" x 5 1/2" cardstock at 4 1/4" to create the card base.
Line up and adhere Panels #1 to the front of the base card.

Score Panels #2 and Panels #3 around the perimeter (optional). I used my Martha Stewart scoreboard and scored at 1/8" around the panels.

Add pop-up dots to Panels #2 and center on top of panels #1.

Center Panels #3 on top of Panels #2.

Add a brad to the right of the door panels as your door knob.

Add any other decorations as desired.

Thursday, June 16, 2011

Matthew 19:26 - VBS Fan

My sister needed my help with a project to teach her VBS students next week. Here is what I emailed to her. Hope she can use it.


1. Cut black card stock to 7" x 7" (our color of your choice)
2. Cut More Mustard card stock to 6 1/2" x 6 1/2" (or color of your choice)
3. Cut the More Mustard card stock into 4 equal pieces (3 1/4" x 3 1/4")
4. Add embossed images to the four squares
5. Attach the four 3 1/4" squares to the front of the 7" x 7" square.
6. Decorate and add embellishments to front as desired.
7. Staple or adhere handle to back of fan.
8. Decorate back as desired

Friday, March 4, 2011

Christmas Card Journal

I can't believe it's March already. I was doing a little spring cleaning this morning and decided to use my 'Cinch' binding machine to bind my Christmas cards I received from friends and family this past Christmas. Normally I just stick them in a box somewhere and DH eventually tosses them when he thinks I am not aware. I think I will start displaying all the cards I receive like this from now on.
Cut 2-inch wide strips of card stock to the height of each card. Adhere to the folded end of your card. Score and fold down the center and punch holes using the hole punch of your choice. Bind as desired (ribbons, wire, rings)

Benefits of this Journal: fully decorated with your choice of cards to use as a cover; readily available and full of inspiration for making more Christmas cards.

Some of my cards are landscape, some portrait, depending on the style of the cards. I think this adds a bit of interest to the Journal. I also added scanned copies of photo Christmas cards to this Journal.

I wanted this to be a true depiction of all cards received. I am now in search of Anniversary and Christmas Cards from the past that DH has not tossed.

Saturday, February 12, 2011

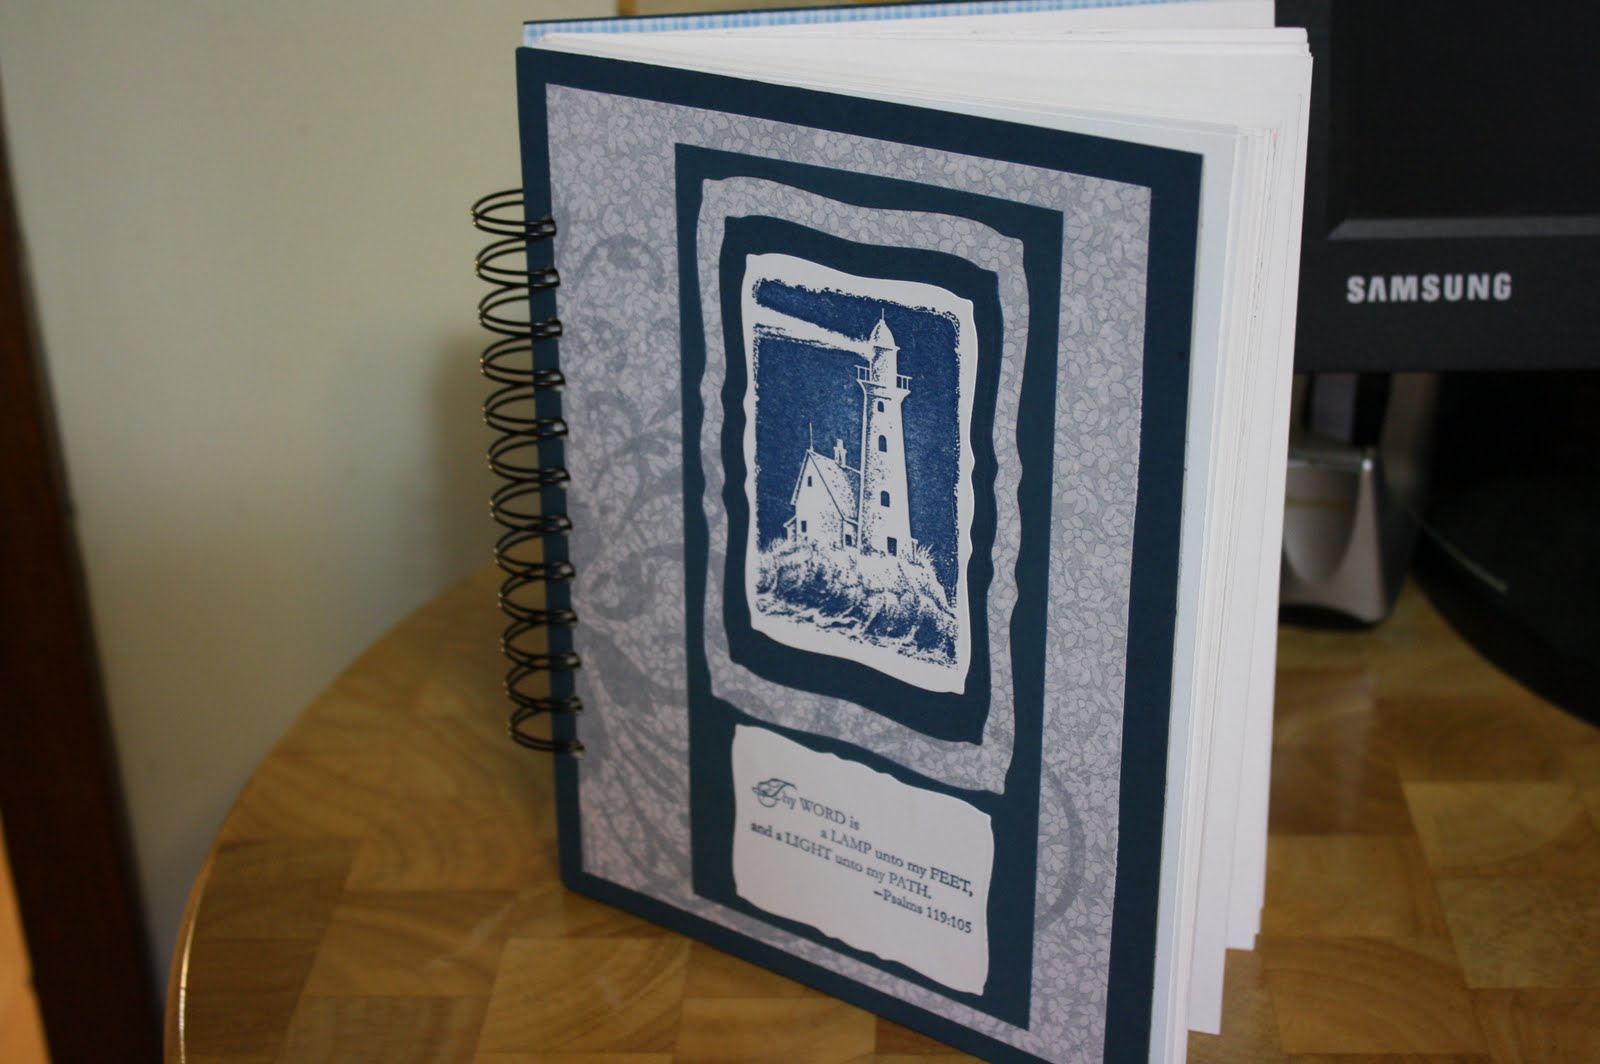
Scripture Journal

I have had my 'Cinch' Book Binding Machine for months and finally decided to use it. DH wanted a journal for his sermons and he wanted to be able to flip the pages quickly and easily. Spiral pages seemed to fit the bill. I used the retired SU "A Light Unto My Path" stamp set for my image and sentiment.

Two 7" x 9"chip board pieces for front and back covers
White card stock cut to fit for inside pages
1" wires for binding
Cinch Book Binding Machine
Not Quite Navy Card Stock (SU!)
Bella Birds DSP (SU!)

I covered the insides of the front and back covers with adhesive-backed card
stock purchased from JoAnn's

Wednesday, January 26, 2011

SC317 (SCS Sketch Challenge)

I am trying to keep my 2011 New Year's Resolution of being more creative and keeping my Blog updated in 2011. To accomplish this, I find the SCS challenges to be an excellent source of inspiration; I eagerly look forward to the weekly Sketch challenges.

I needed to make a card for my daughter's 'in-laws' to thank them for the wonderful Christmas gifts they gave DH and me. Her MIL reads a lot so I decided to make a 'Book Mark' Thank You Card.

Cut card stock to 5 1/2" x 11"
Score at 4 1/4.

Use preforated blade to make preforations at 8 1/2". This will become your 'Detachable Book Mark'.

Decorate as desired.


Detachable Book Mark

Card Stock: Apricot Appeal, Whisper White; Basic Black;
DSP: Apricot Appeal;
Ink: Apricot Appeal; Archival Black;
Stamp Set: Simply Said;
Ribbon: Whisper White

Thursday, December 30, 2010

iTunes Gift Card Holder

I had a hard time trying to match up my card stock with the iTunes gift cards for my daughter and son-in-law. I decided to use Melon Mambo for hers and Wild Wasabi for his. These gift cards are larger than the normal ones so here are the measurements I used:

6 1/2" x 9" card stock
Score on the 9 1/4" side at 1 1/2" and 5 3/8"
Decorate as desired.

I attached the image panel to the ribbon on the front. Once untied, the gift card holder can be easily opened.

Friday, August 14, 2009

Faux Clipboard


It's been a while but I have a few projects. I'll start with this 'Faux Clipboard'. I got the idea from one of the booths at Scrapbook Expo in Duluth, GA, in July. Here's a tutorial on my take of it.

Supplies:
Binder Clip
Post-it Notes
12" x 6" Chipboard
12" x 12" DSP or Scrapbook Paper
Clothes Pin
Embellishments
Strong Adhesive (Red-Liner Tape)
Glue Stick, snail or some other adhesive
Pencil
Coordinating Ribbons

Cut chipboard to 12" x 6"
Adhere DSP or Scrapbook Paper to front of chipboard
Using Red-liner Tape, Adhere Post-it Note to front
Cut a piece of DSP small enough to cover front of Clothespin and cover
Add Sticky Strip to back of clothespin and attach to Clipboard
Decorate Front of Clipboard
Tie Ribbons to Binder Clip and Clip on top of Clipboard
Hang your Clipboard using the back wires of Binder Clip as the hanger

Note: Use Repositional Adhesive to attach embellishments & change as desired.
Suggestions for use: Small Calendars, Grocery List, To-Do List, Emergency Phone Numbers, Birthdays & Anniversaries, Reminders.

Thursday, March 12, 2009

For Barbara


I am a member of and teach a class at the local Senior Citizens' Center and have gotten to know a lot of the wonderful members at this Center. One person near and dear to my heart is our bus driver, Barbara. Barbara lost her brother last month and has sent cards to the many members who sent flowers and well-wishes. She wanted to recognize all of the members at the Center who embraced her with their love and support so she asked me to make her a 'big ole thank-you card' to leave up at the front desk for all to view. It took me a few tries before I finally came up with this one because I'm so use to making A2-sized cards that 'big ole cards' are out of my comfort zone. After making this one, I wish I had made two rather than one.

I didn't want the card to be depressing so I decided to go with something sunny... the 'More Mustard' family. It's an accordion-style card with the inside sentiment typed on my computer and printed out on Very Vanilla card stock, then cut out with one of my Nesties. Below are more details. If you have questions, please leave a comment.

Card Base: Chocolate Chip card stock (2) cut to 8-1/2" x 6-1/4"
Accordion Spine: More Mustard card stock cut to 8-1/2" x 3", score at 1", 1-1/2", 2"
Inside Page Card Base: 8-3/8" x 6"
Stamp Sets: Heard from the Heard; Thoughts and Prayers
Ribbons: Chocolate Chip; More Mustard
Inks: Timber Brown StazOn; Apricot Appeal; Summer Sun; Kiwi Kiss

Sunday, October 26, 2008

The Shoe


Like my shoe? My inspiration came from creativechoicedesigns (http://www.splitcoaststampers.com/gallery/photo/251740?cat=500&ppuser=54600). If you want the template, follow directions she listed. I needed a box to present my shoe in so I created one. If you need a box for your shoe, here are the instructions:

Box:
1. Cut Card Stock to 8 1/2" x 9 1/2"
2. Score at 2: on all four sides
3. Follow normal directions for making boxes

Box Top:
1. 8 1/2" x 9 1/2" Card Stock
2. Score at 1 15/16" on all four sides (just a scooch under 2" so that top will be slightly larger than bottom.
3. Optional - Use the Stampin' Up! Scallop punch, Stampin' Up! Slit punch, or Decorative-Edge Scissors to go around the four sides of your box top if you want scallops.

If you have questions, please leave a comment

Supplies used:
Black Card Stock (Box Bottom)
DSP used for Shoe and Box Top (Purchased at JoAnn's)
Wine Ribbon (Michae's)
Flowers used on Shoe and Box Top (Michael's... Floral Section)
Pearl Brads for Flower Center (Michael's)
Cut-out on Top of Box (Stampin' Up! Bigz Die)
Embossed Shoe on Cut-out (Sizzix Brass Die)
Scallop Punch from Stampin' Up! for scallops on bottom of Box Top
Tagger from "Around the Block"
Nestabilities Die (Small Oval Scallop)
Sentiment on Die Cut: Riveting (Stampin' Up!)
Sentiment on Top of Box: Computer Generated.